Hour bank for leave or payout

Hour bank vs. Flex time
Many employment contracts and agreements distinguish between flextime and overtime. Therefore, TimeGuru also supports separate management of these areas.
Flextime
Flextime is the opportunity for the employee to control their own work-hours. Typically, within an agreed period of time. This can perhaps be flexible meeting time from 7 to 9 and equivalent flexibility at the end of the workday.
Common for flextime agreements is, the employee get the opportunity to organise a flexible workday. The employee is responsible for keeping the flextime-balance within the agreed framework.
Overtime
Overtime is typically work-hours outside the normal agreed worktime, that also is agreed with the closest manager. There can be different types of overtime. Some types are earned 1 to 1 while other kinds have a time factor.
When an employee earn overtime, they are typically able to choose whether the hours are to be used for time off or payment.
Check out our run-through of extra fees and overtime for time tracking.
Hour bank in TimeGuru
In TimeGuru you can control overtime with a term we call “hour bank.” You can setup one or multiple activities for “entering hours in the bank” with or without hour factor.
If you already have a TimeGuru system, you can try setting up an activity to be a part of the bank.

Info: You must select “Exclude from flextime” and tick off “Add registered hours to hour bank.” Hereafter, all registrations on this activity will also be inserted in the employee’s hour bank with the desired hour factor.
The hour bank is normally used for saving and use/pay out of various types of agreed overtime.
The employee can always follow their hour bank balance in the Dashboard. Here, you can also see an overview of time, flextime, mileage and leave details + more. Example on Dashboard overview:

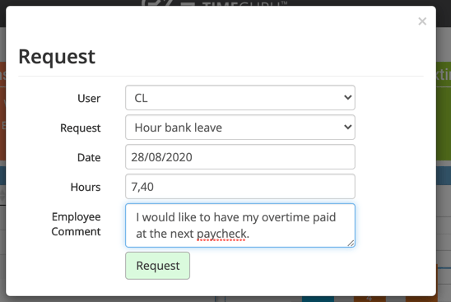
From “My Dashboard” the employee can request vacation or payout from the hours in the hour bank + more. The options depend on the selected setup.

All requests go to the closest manager and payment/vacation will be booked automatically upon approval.
System settings
Above, we set up one or multiple activities to “insert hours in the bank” when the user register time on these activities.
The hours can be used for free time or payout. This will happen automatically when the manager approves a request for “vacation” or “hour bank pay out.”
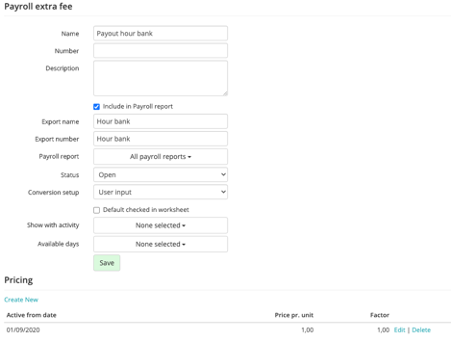
To finish setting up, you must create an activity for “hour bank time off” and a payroll fee for “Pay out hour bank.” The activity is created without members, as the system automatically handles write-down of balance when freedom or payout are approved by a manager:

Setup of payout for hour bank:

Now, you have to inform your system which activity and payroll fee is to be used for automatic payout or leave from the hour bank.
Go to the menu > settings > system settings.
Go to the second tap “2. Select modules” and find the section “hour bank setup.” Select the activity you have created for leave (Leave hourbank) and the payroll fee you created for overtime (Payout hour bank). Project- and customer selection is not mandatory, but can be used if they are mandatory in data export to, for example, payroll system:

After, save your setup and test the hour bank setup by:
- Create a time registration on an activity that will put hours in the hour bank (typically an activity for agreed/ordered overtime.
- Go to “My dashboard” and check that you now have hours in the hour bank (see how to setup your Dashboard if the hour bank balance is not visible.
- From the dashboard you can now request leave or payout from the hour bank.
- If you are a manager or administrator, you can update the screenshot (F5) and approve the request.
- Your hour bank will now be written down automatically and you will see an adjustment in your worksheet on the day the request was approved.
You are welcome to contact us if you want to know more or if you need help setting up your TimeGuru hour bank.